Trails for beginners at Mount Rainier!


One of the adventure goals I have for TheWonderList.xyz is to visit all of the National Parks during my lifetime (who has done this? PLEASE CONTACT ME!). So far, this year, I have wondered Sequoia National Park, so when the idea of visiting Washington came about, Mt. Rainier immediately came to mind (duh!). I came to this beautiful part of the country as a child, but seeing it again as an adult was life-changing. I only had two days in the park which was enough time to see most of it and venture on some spectacular hikes. From hitching up a hammock, along The Wonderland Trail, to walking down the Narada Falls path, it taught me a lot about myself and the history of the park.
But, I need to be honest: I’m not a big hiker; that’s why this article is perfect for those who are amateur hikers but love the great outdoors. I have listed below some of the most beautiful and easiest hikes the park has to offer. There is something about nature that brings your soul back to life. One of my all-time favorite quotes is from the legendary naturist, John Muir, who sums up my experience, “into the forest I go. To lose my mind and free my soul.” Let’s adventure forward and check out the pretty trails in the park that even your children will love (and won’t get tired out!)
“Of all the fire mountains which like beacons, once blazed along The Pacific Coast, Mount Rainier is the noblest.””


Trail: Narada Falls Trail
Skill Level: Easy-Moderate
Distance: 0.7 miles
Elevation Gain: 862 feet
Directions: From the Nisqually entrance on Highway 706, 18 miles on Longmire-Paradise Road to the main Paradise Parking area.
The trail begins at the Lakes Trail trailhead where the lot funnels into a one-way road through Paradise Valley .
***Leave it to me to rock a dress at the bottom of the Narada Falls trail to get that perfect magical photo. This trail is a short hike down and is absolutely breathtaking when you reach the bottom. It has a total of 2 drops and is easy to access. Although most people experience Narada Falls by hopping out of their cars at the parking area and walking a dozen feet to the main overlook, there is a longer trail that is worth exploring. Part of the trail was covered in snow, so it’s important to wear the appropriate footwear if you decide to hike.
***Even though I wore this dress for the photo, don’t kid yourself, I was wearing my favorite La Sportiva shoes ($190 at REI) that aided in making the hike as comfortable as possible. This is also a popular spot in the park and during the summer it can be a bit more crowded than other trails. Be on the lookout for deer sightings!
Hitching a Hammock along The Twin Firs Loop Trail

Trail: The Twin Firs Loop Trail
Skill Level: Easy
Distance: 0.4 miles
Elevation Gain: 100 feet
Directions: From the Nisqually entrance of the park, Drive just past the Kautz Creek Trailhead and facilities to the (signed) Twin Firs Trailhead, on the left side of the road.
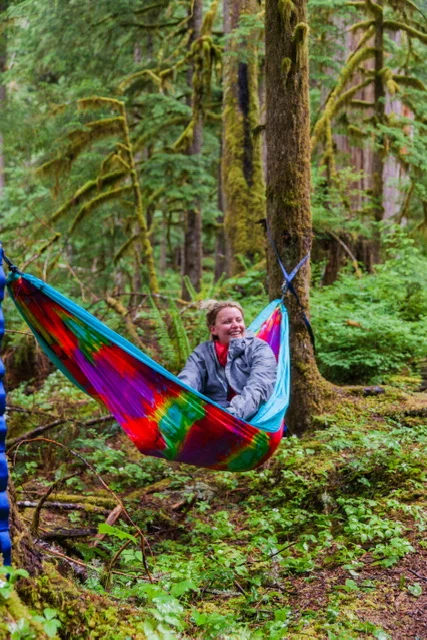
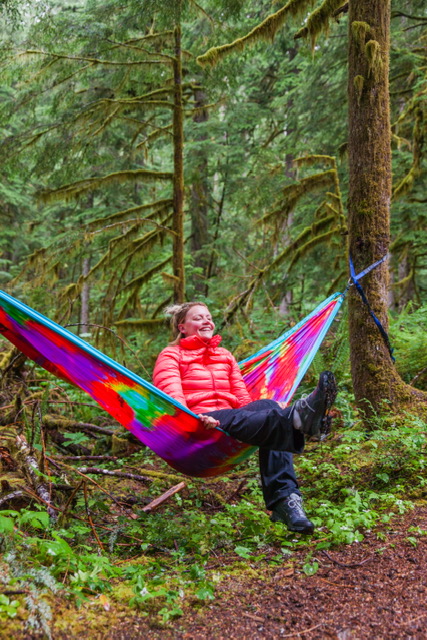
***One of the most tree-dense, gorgeous hikes in Mt. Rainier is the Twin Firs Loop Trail. Surrounded by beautiful evergreens and overgrown with old trees that smell of fresh cedar. The trail begins between the twin firs, parallels the road, and climbs uphill, crossing several streams. It ends within a few feet of the starting point. Exercise caution due to fallen timber. In the Spring, you can view some wildflowers that include shades of violet. It’s the transition from Winter to Spring, dark to light, and it is…need I state…truly magical. I found this trail rather quiet and thought it was the perfect place to set up my amazing ENO Hammock I picked up at REI ($79). I have wanted one of these for as long as I can remember so what a place to try it out than the beautiful forests of Washington. Click HERE if you want to know more about them. It drizzled on me that particular day but I didn’t mind; the soft scent of rain meshed perfectly well with the moss on the trees and I hung between them, like an ornament on a Christmas tree. A perfect summer moment I will never forget.
Wonder Fact: You can purchase them in many different colors and it is important to note when you purchase: Make sure you get the adjustable straps separately. Often times, people will purchase the hammock without getting the straps and then you are out of luck.
The Stevens Creek Trail


Trail: Stevens Creek Trail
Skill Level: Moderate
Distance: 1.2 miles
Elevation Gain: 429 feet
Directions: From the Stevens Canyon Entrance on Highway 123, west 10.8 miles on Stevens Canyon Road to the Box Canyon Picnic Area on the left side of the road. The trail starts at the east side of the parking lot.
***The trail descends through a coniferous needle padded trail that occasionally touches on Stevens Creek for views of a waterfall, small gorge, and boulder-covered river views. You also come to an awesome tree bridge that is great for pictures and just hanging over the river. This was my last trail to hike on the trip and one of my favorites. A ton of trees are fallen over along the trail so that was pretty cool to see. Only a few people have been lucky enough to see an actual tree fall on it’s own in the forest. What a sight that would be! This trail is peaceful but a solid incline leaves room for some great exercise as well!
Hiking The Skyline Trail in the Snow!


Trail: The Skyline Trail
Skill Level: Moderate
Distance: 5.5 miles (roundtrip)
Elevation Gain: 1700 feet
Directions: From the west, from the 5 Freeway in Tacoma, take exit 127 onto Route 512 east and drive 2 miles to Route 7 South. Turn right and drive 65 miles, passing through the town of Ashford and into Mount Rainier National Park. Pass Narada Falls and turn left on Paradise Road, concluding the trip with two miles of switchbacks up the Paradise. From the east side of the park, take Route 123 to Stevens Canyon Road (near Ohanapecosh) and drive west for 19 miles to Paradise Road. Turn right and drive two miles of switchbacks up to the parking area at Paradise. The trail is located between the visitor center and the inn.
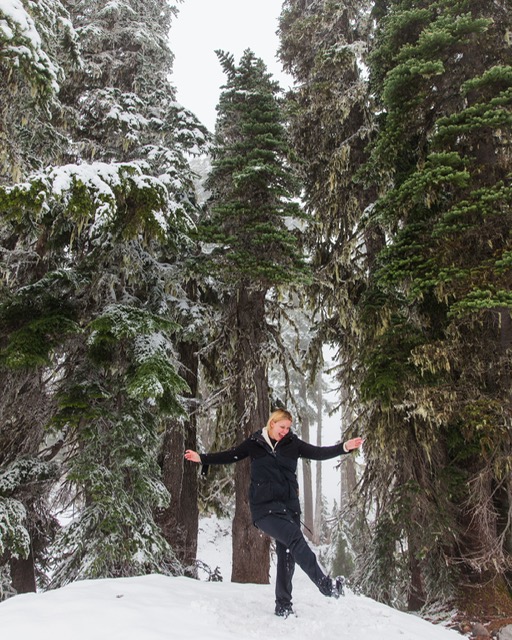
**** It didn’t occur to me that the snow on the top of Mt. Rainier would subside until July at the very least but I still wanted to hike the Skyline trail as it’s known to be one of the prettiest if not the prettiest hike in the park. With views of the top of the glacier and it’s supposed wildflowers (which don’t appear until July), this hike is one for the books. Even though it felt like a blizzard as we trucked through the snow, we still managed to hike part of the trail and come to a raging waterfall. Being from Los Angeles, I didn’t mind the snow, in fact, it was fun to play in. There were points along the trail where I couldn’t even see the ground and I had to make my own footprints to find my way back. It was a challenge to say the least but a fun accomplishment. Definitely want to come back here when the sun is shining down on the glacier!
The Grove of The Patriarchs


Trail: The Grove of the Patriarchs
Skill Level: Easy
Distance: 1.5 miles (roundtrip)
Elevation Gain: 50 feet
Directions: From Packwood, drive east on HWY 12, cross the Ohanapecosh River and turn left onto SR 123. Follow the road past the Ohanapecosh Visitors Center and turn left onto Stevens Canyon Rd. Parking is available in the first area on the right, intersecting the Eastside Trail.
****This is an easygoing trail, fun for all ages and you can get up close and personal with some enormous Douglas Firs and Cedars. These trees are ancient and can be found to be nearly 40 feet in diameter and 300 feet tall! WOW! (This is their version of The Sequoia’s). Follow a wooden trail that leads to a suspending bridge read some interesting facts along the way! (NOTE: DO NOT BRING YOUR ANIMALS ON THE TRAIL) I saw a girl walking a dog and I was completely shell-shocked. To read more about why dogs are hazardous to national parks, please read HERE!
If You’re not a fan of hiking, check this out…
The Nisqually River Lookout

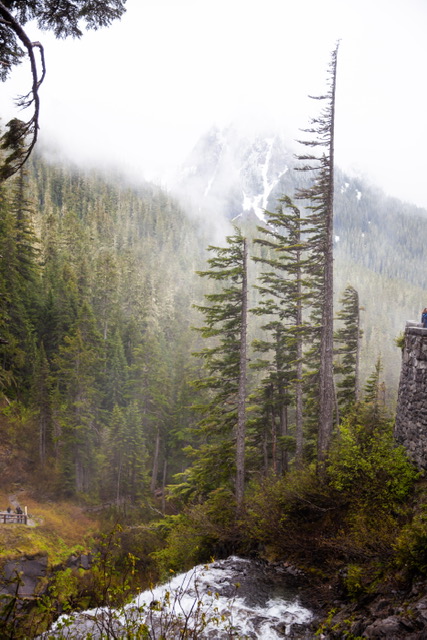

If hiking isn’t your cup of tea or just want to go for a scenic drive in the park, you want to stop at The Nisqually River Lookout which is located near the top of the mountain. It overlooks the glacier, the gorge, and even though it is dried up below, the views are spectacular as shown above. This had to be one of my all time favorite views because you can see all the different colors that the park provides. There is an easy turn off where you can park your car near the bridge and go take a walk on it. It is absolutely breathtaking and if you’re really lucky, on a clear day, you can see forever.